The moment you walk into a kitchen, your eyes naturally settle on the cabinets. They frame the space, define its character, and quietly influence how you feel every time you step inside. If your cabinets are starting to look tired or outdated, it does not always mean you need a full replacement. Refinishing offers a practical and creative way to breathe new life into your space without the cost and disruption of a complete renovation. With the right ideas, you can completely transform the look and feel of your kitchen while keeping its structure intact.
Why Cabinet Refinishing Is Worth Considering
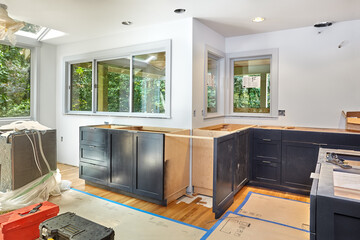
Cabinet Refinishing Modesto has become a popular option for homeowners who want a fresh look without the expense of new cabinetry. It allows you to update the surface of your cabinets through sanding, painting, staining, or applying new finishes. This process not only saves money but also reduces waste, making it a more environmentally responsible choice.
Another advantage is the flexibility it offers. Whether your style leans toward modern minimalism or classic warmth, refinishing gives you the freedom to customize your cabinets to match your vision. It is also less time consuming than a full replacement, which means less disruption to your daily routine.
Choosing the Right Color for a Fresh Look
Color plays a powerful role in cabinet refinishing. A simple change in color can make your entire kitchen feel brighter, larger, or more inviting. Neutral shades like white, cream, and soft gray continue to be popular because they create a clean and timeless appearance. These colors reflect light well and can make smaller spaces feel more open.
For those who want something more distinctive, darker tones like navy blue, forest green, or charcoal can add depth and sophistication. These shades work especially well when paired with lighter countertops or backsplashes. If you are feeling bold, you might even consider a two tone approach where upper cabinets are painted a lighter shade and lower cabinets a darker one. This creates visual contrast and adds a designer touch without overwhelming the space.
Exploring Different Finishing Techniques
Refinishing is not just about changing color. The technique you choose can dramatically affect the final look of your cabinets. A smooth painted finish offers a sleek and modern feel, while a stained wood finish highlights the natural grain and adds warmth.
Distressed finishes are another option for those who prefer a more rustic or vintage look. This technique involves intentionally aging the surface to give it character and charm. Glazing is also a popular method that adds depth by applying a translucent layer over the base color, enhancing details and creating a subtle antique effect.
High gloss finishes can give cabinets a contemporary edge by reflecting light and creating a polished appearance. On the other hand, matte finishes provide a softer, more understated look that works well in a variety of design styles.
Updating Hardware for a Complete Transformation
While refinishing focuses on the cabinet surfaces, updating the hardware can make just as big of an impact. Handles, knobs, and pulls act like jewelry for your cabinets, adding personality and style.
Switching to modern hardware with clean lines can instantly update older cabinets. Brushed metal finishes such as nickel or stainless steel offer a sleek and contemporary feel. For a warmer look, consider brass or bronze tones that add a touch of elegance.
The style of the hardware should complement the overall design of your kitchen. Simple bar pulls work well in modern spaces, while more decorative knobs can enhance traditional designs. Even a small change in hardware can tie the entire refinishing project together and make the cabinets feel brand new.
Incorporating Open Shelving and Glass Panels
If you want to go beyond traditional refinishing, consider incorporating elements like open shelving or glass cabinet doors. These features can break up the visual weight of solid cabinets and add interest to your kitchen.
Replacing a few cabinet doors with glass panels allows you to display dishes, glassware, or decorative items. It creates a lighter and more open feel, especially in smaller kitchens. Frosted or textured glass can provide a similar effect while maintaining some privacy.
Open shelving is another option that can make your kitchen feel more spacious. It encourages you to keep items organized and can serve as a place to showcase your favorite pieces. When combined with refinished cabinets, these elements can create a balanced and visually appealing design.
Adding Texture and Detail for Visual Interest
Texture is often overlooked in cabinet refinishing, but it can add depth and character to your space. Techniques such as beadboard paneling or shaker style detailing can give plain cabinet doors a more refined appearance.
You might also consider adding molding or trim to enhance the architectural feel of your cabinets. Crown molding at the top of cabinets can create a more finished and elegant look, while base trim can add weight and balance.
Another idea is to experiment with subtle patterns or finishes that create visual interest without overwhelming the design. For example, a lightly textured paint or a wood grain effect can add dimension and make your cabinets stand out in a unique way.
Embracing Modern Trends While Staying Timeless
Trends in cabinet design continue to evolve, but it is important to strike a balance between current styles and timeless appeal. Matte black finishes, for example, have gained popularity for their bold and modern look. When paired with lighter elements, they can create a striking contrast.
Natural wood tones are also making a strong comeback, offering warmth and authenticity. These finishes work well in both modern and traditional kitchens, making them a versatile choice.
While it can be tempting to follow every trend, focusing on elements that you genuinely enjoy will ensure that your cabinets remain appealing for years to come. Refinishing gives you the opportunity to experiment while still maintaining a sense of longevity in your design.
Preparing Your Cabinets for Refinishing
A successful refinishing project starts with proper preparation. Cleaning the cabinets thoroughly is essential to remove grease, dirt, and residue that can interfere with the new finish. Sanding is another crucial step that helps create a smooth surface and ensures better adhesion.
Choosing high quality materials can make a significant difference in the final result. Paints and stains designed specifically for cabinetry tend to be more durable and resistant to wear. Taking the time to prepare properly will help your refinished cabinets look professional and last longer.
Patience is key during this process. Allowing adequate drying time between coats and following recommended guidelines will prevent issues such as peeling or uneven finishes. While it may take some effort, the results are well worth it.
Maintaining Your Newly Refinished Cabinets
Once your cabinets have been refinished, proper maintenance will keep them looking their best. Regular cleaning with gentle products can prevent buildup and maintain the finish. Avoid using harsh chemicals that can damage the surface.
It is also helpful to address spills and stains quickly to prevent long term damage. Using soft cloths and non abrasive materials will protect the finish and keep it looking smooth and polished.
Over time, minor touch ups may be needed, especially in high traffic areas. Keeping a small amount of leftover paint or stain can make it easier to handle these repairs and maintain a consistent appearance.
Conclusion or Final Thought
Cabinet refinishing offers a creative and practical way to transform your kitchen without the need for a full renovation. From choosing the right color to exploring different finishes and adding thoughtful details, there are countless ways to personalize your cabinets and elevate your space. With careful planning and attention to detail, you can achieve a look that feels fresh, stylish, and uniquely yours. Whether you prefer a subtle update or a bold transformation, refinishing provides the flexibility to bring your vision to life and enjoy a renewed kitchen for years to come.